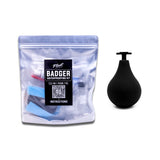
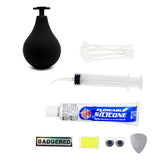
Badger your Onewheel with the ORIGINAL DIY waterproofing kit! Extend the life of your board by protecting your footpads and electronics from splashing or seeping water.
INSTRUCTIONS
Before you begin:
Make sure you have everything. The kit now also includes a syringe that should be used for the Flowable Silicone.


Step 1: Prepare the board (10 minutes)
Remove footpads, bumpers, and the controller module using the included hex key. Clean off any dirt and make sure you have a clean work surface where it will be easy not to lose anything. Be careful removing the connectors from your controller. See the below video:
Step 2: Remove the vents (5 minutes)
The Sniffer Snorter leak checker requires the vents to be removed. Spare vents are included just in case the original are damaged. If you don’t want to remove your vents, make sure you do an extra thorough job of sealing and cross your fingers for luck. Use the backing from your packing slip to safely hold the vents (use the waxy side that the packing slip was on).
Step 3: Test out the Sniffer Snorter (2 minutes)
Check your components before sealing to see for yourself how leaky they are. The Sniffer should fill with air very quickly. Practice holding it against a smooth surface to make sure you can get a seal that holds air. If it doesn’t fill with air, it means you are sealed. YOU decide how long to wait before you are confident there are no leaks. 20 seconds with no inflation is typical.
Step 4: Controller Charge Port Seal (1 minute)
Use the Super Thin Silicone for this. Put in enough to completely flood the bottom of the connector, then use the eyedropper to suction out the excess. Set the controller on its side so the liquid stays in the bottom of the port and leave it for 30 minutes. Check that the silicone is completely set before doing anything else to the controller.
Step 5: Battery Module Housing (10 minutes)
Use the Flowable Silicone with the skinny dispenser nozzle for all the highlighted areas:


Step 6: Battery Connector (5 minutes)
I did this in red sealant to illustrate where to seal. Use the Flowable Silicone and go all the way around the connector as shown.

Then seal up the end of the cable wrap with Flowable Silicone (NOTE: use the tube of Flowable silicone where the video is showing a syringe.):
Stand your board up with the tail on the ground to allow the silicone to flow down into the cable.
Let cure for 30 minutes.
Step 7: Seal your footpads (10 minutes)
Your Controller and Battery are curing, so it’s time to do the footpads:
Check your kit for the 2 blue strips:
Front footpad: narrow strip
Rear footpad: wide strip
IMPORTANT for non-fender users:
The Badger kit needs a fender to hold the foam and protect it. If you are not going to be using a fender of some kind, DO NOT cut your grip tape. Instead, just peel it back and stick the clear plastic strips under it. The grip tape will hold the plastic in place. Seal the sides with silicone.
The video shows the foam in pre-cut strips. The kit now includes just one big piece, but the technique is the same. Start by cutting 4 pieces from the wider foam strip, each 1.5 inches long. Here’s how to do it:
Seal up the connector here:
![]()
Step 8: Controller (10 minutes)
Your controller should be removed for this (or you can remove the wheel), and the XLR port silicone should be finished curing from Step 3.
LESS IS MORE!! The silicone flows slowly, just be patient. You need to leave enough space to put your connectors back on. Be EXTRA careful putting the Thin Silicone in to not get it all over the pins. Do it like the video shows.
Use the Flowable Silicone with the skinny dispenser nozzle for all the highlighted areas:


Step 9: Verify with the Sniffer Tool
Same as Step 2. The Sniffer should remain in the compressed state for at least 20 seconds if all the leak points are sealed. If it slowly expands, examine all your seals for any missed areas and apply again.
Step 10: Clean the pins
Did you possibly get any silicone on the pins of the controller? Clean them now with Q-tips and alcohol.
Step 11: Put the new vents on
Clean the vent area with the q-tips and alcohol before applying vents. Be careful not to touch the adhesive with your fingers. Use the vent tool instead. They go on just like a sticker. Press them down firmly once in place. Here’s a video tutorial:
Step 12: Grease up the connectors
It will make them much easier to assemble or disassemble in the future and provide some extra sealing
Step 13: Partially reassemble and test
Push the controller back in and plug in the battery and the motor. Make sure it turns on. Plug in the charger: make sure it charges normally. Plug in the footpad: make sure you can engage normally.
If anything is not working normally, you might have gotten silicone on the pins. Plug and re-plug the connectors a few times to scrape the pins clean. Or, use a q-tip and alcohol.
Step 14: Wait for it to fully cure
Wait at least overnight before riding, and at least 24 hours before water exposure for the most reliable results.


